There’s something magical about watching the time slipping by in the form of sand – I think hourglasses have almost the same mesmerizing effect as an aquarium or a fountain.
I love making things, so I found a way to make my own hourglass (all from things I already have!)
This project turns old glass containers that might otherwise be tossed away into a work of art. This is what’s called upcycling.
(which is great because it lets you be a tree hugger and an artist at the same time 😀 )
Here’s how you can make yours:


Sand (because buying craft sand is actually so expensive! :O )
Materials
- white sugar
- food colouring
- corn starch
Tools
- Ziplock bag
- funnel
Steps
- Fill 1 of the glass containers used for the hourglass body around 3/4 full with sugar. This is how much you’ll need.
- Pour the sugar into the Ziplock bag (it’s safer with a funnel)
- Add 1 drop of food colouring.
- Push out as much air as you can, and seal bag tightly.
- Knead bag to spread food colouring. Be careful you don’t break the sugar crystals!
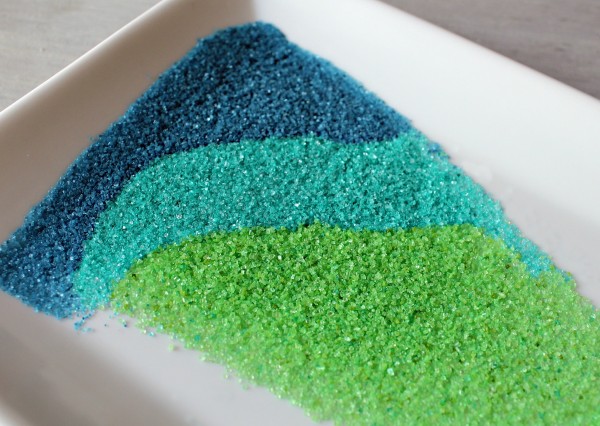
- Repeat step 3 until the sugar is the colour you want!
- Add a pinch of cornstarch and mix like above to prevent sugar from sticking/clumping. Repeat as needed.
Extras:
- make different colours to create layers of colour in your hourglass
- mix in small seeds or clumps of cornstarch for “polka dots” in the sand
I found the instructions here – this site has pretty pictures of all the steps 😀
Alternatively, you could make coloured flour.
Hourglass body
(This site has pictures of the steps. I modified their instructions to make it easier, but the general process is the same)
Materials
- 2 glass bottles/jars with the same size opening
- 1 disposable plastic box / cardboard
- twine/ribbon/string
- packing tape / hot glue gun
_0_detail.jpg)
Tools
- funnel
- scissors
- thin marker
- single hole punch
- skewer/needle / pointy object
Extras
- tape/tie small origami or your favourite figurine to string/dental floss, and tape the string/floss to the bottom of the glass containers
(NOTE: it’s better to suspend things than to leave them roaming free in the jar, as they could block the hole and prevent sugar from passing through) - draw on the jars with permanent/glass markers, or draw on clear tape and stick it onto the jar
Steps
- Place 1 of the glass containers upside down on a piece of the plastic box or cardboard, and trace the opening with marker. Cut out what you traced, and punch a hole in the center of the piece.
- Add any decorations! (see Extras section).
- Pour sand into 1 of the glass containers (use the funnel! Trust me on this.)
- Tape the plastic/cardboard piece from step 1 onto the opening the container. Make sure it’s secure! Use a skewer or other pointy object to puncture the tape where the hole is, and cut out the tape covering the hole using scissors.
- Place the other (empty) glass container on top of the plastic/cardboard piece and the first container. Ensure the openings are aligned. Wrap packing tape a few times around the two jars to join them.
- Carefully turn the hourglass over so the container with sugar is on top. Check to see that the sugar flows smoothly through the hole.
- Join containers completely together by using more packing tape to wrap around the part where the two containers join.
Or, rip off the tape used above to quality check and use a hot glue gun to join the two jars together. - Shake and try to bend the containers to ensure they’re securely joined. If they move, your tape job wasn’t tight enough!
- Wrap ribbon or string around the middle of the hourglass where the containers join to cover the tape/glue.
- Sit back and be mesmerized by the sheer wonder of what you’ve just made – wasn’t that easy?

Simple yet classy, bold but not flashy.